

While there are now all-season models on the market, most RVs are not designed for full-time use which is exactly what we’re doing. In fact, in our Heartland Sundance Owner’s Manual, it specifically states…
“Your fifth wheel was designed primarily for recreational use and short-term occupancy and has not been designed for full-time living.”
It also goes on to say about RVing in the winter…
“Heartland Recreational Vehicles does not recommend this RV for use in the winter unless it is equipped with an all-season package.”
Guess what our RV doesn’t have. That’s right, an all-season package. Yet, here we are full-time RVing in the winter – albeit the best winter conditions in Canada. One of the reasons that RV manufacturers warn against full-time RVing and RVing in winter conditions is because of RV condensation.
Staying in your RV for extended periods of time, especially in cold temperatures, will cause chaotic amounts of humidity inside of the RV which then causes RV condensation. High amounts of condensation will then lead to the creation of mould which is something nobody wants to have to deal with. This is one reason why RV manufacturers don’t recommend full-time RVing. If you have an issue caused by condensation and/or mould and try to have it fixed under your warranty, RV manufacturers will void the warranty if they discover you’ve been full-time RVing.
How Condensation is Formed in an RV
In normal living environments, condensation is created when water vapour becomes liquid. Think of it as the opposite of evaporation. When water vapours become cold, the water vapours come together into a group which then creates water droplets.
Unlike a sticks & bricks home, RVs typically don’t include the usual amount of insulation that goes into a residential home. RVs also rarely include double pane windows. Combined with the water vapour that’s created inside of an RV, these are two of the main reasons RVs are prone to heavy condensation.
Cooking & bathing are two of the main causes of extra water vapour inside of an RV but the biggest contributor to the extra water vapour in your RV is you and your family. As humans, the air that we breathe contains water vapour which we don’t normally see. In our Heartland Owner’s Manual is says that a family of four can create up to 3 gallons of water vapour on a daily basis through breathing, cooking, bathing, and washing. This can result in a lot of RV condensation which is a pain in the behind.
Often RV condensation is visible and will mainly appear on the single pane windows during rainy and/or cold temperatures. While this RV condensation is not ideal, the fact it can be seen means that it can be somewhat dealt with. The RV condensation that you really must worry about is the condensation that happens out of sight. Condensation can hide from you within your walls or even in your ceiling. When you can’t see it is when you have a problem as this will lead to the growth of mould within your RV. At times you will also see your walls “sweating” in spaces where air flow isn’t the best like behind a couch.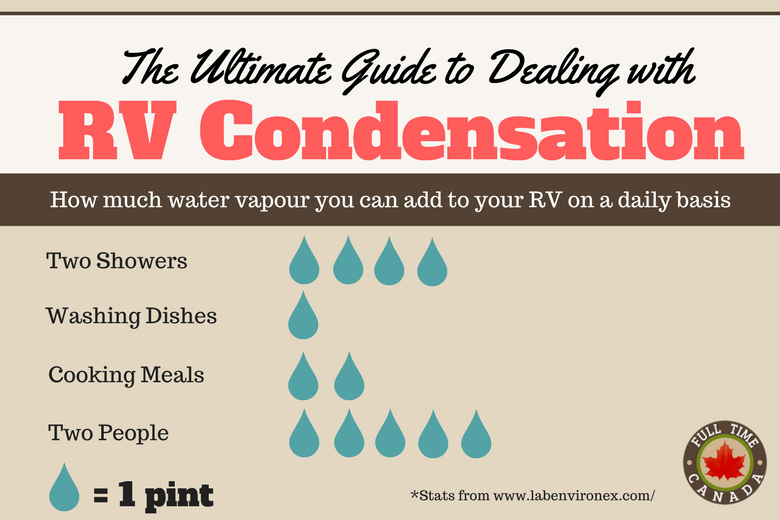
How to Fight Back Against RV Condensation
Knowing the issues – specifically, mould – that condensation creates, it’s important to fight back against RV condensation. The good news – it’s not that hard. With a few small adjustments to your daily routine, you can live comfortably in your RV without ever having to wipe up windows soaked in condensation or sweaty walls.
Crack a Window or Vent
By cracking a window or vent you will provide better circulation of outside air into your RV which is often dryer, helping to reduce condensation. This is a great solution depending on where you’re parked and environmental circumstances. If you’re living in cold temperatures, you likely don’t want to crack a window or vent because of the cold air that it will let in. This, of course, will lead to an increased amount of furnace use which can get costly. Your propane furnace also creates water vapour when burned so cracking a window could be pointless and cost you big bucks in propane.
This is a good solution if you’re camping in warmer conditions or can use electric heaters to warm your RV.
Use Lids and Range Vents When Cooking
Cooking is a major cause of RV condensation. Have you ever noticed that as soon as you start boiling a pot of water for some delicious pasta that your windows fog up? Yup – it’s the same thing happens in an RV but much quicker. While cooking, use lids to cover your pots and pans which can cut down on the amount of water vapour escaping. Also, make sure you have your range vent open and running as a method to direct any steam/water vapour outside rather than inside. When taking your lids of your pots & pans, do so slowly and tilt the lids to direct the steam/water vapour towards the range vent.
If you’re cooking using your normal propane stove top, like your furnace, you will be creating water vapour. There are many RVers who never use their propane stove or oven and use hot plates, convection ovens, or induction burners. Again, this can help save money on propane & reduce water vapour.
Use Campground Showers
A lot of RV showers are so tiny that someone that’s my height (6’2) can’t have a comfortable shower. Before we even moved into our RV we planned on solely using our shower for storage. Of course, this has meant that we have had to use the campground washrooms for showering. Sometimes venturing out into the rain or cold to use the shower can be a tad unpleasant. Some campground showers are completely gross, too. However, some are spa-like, allowing for a nice & relaxing shower.
The real reason you should use the campground showers is because of the amount of water vapour that’s created when you shower. Even in a residential home, when you have a hot shower the windows and mirrors steam up. In an RV you’re creating a tonne of water vapour that will cause RV condensation. Cracking a window or vent will help but if you’re full-time RVing it’s probably best just to use the campground showers.
Open Your Closets/Cabinets
If you’re living full-time in your RV, it’s a good idea to keep your closets & cabinets partially open to allow for air flow. This will help keep RV condensation down. It will also help you keep your clothes from feeling damp and/or smelly musty. The increased air flow should also stop condensation from being an issue in those tight spaces.
DIY Double Pane Windows
So, your RV doesn’t come with double pane windows. Not a big deal. You can easily create your own. Growing up I remember my parents insulating the windows of our home with plastic wrap to help keep the home toasty throughout the cold winter months. Essentially, you can do the same thing with a window insulation kit.
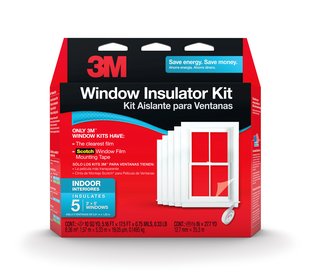
These affordable kits give you a clear plastic wrap which you seal to the inside of your RV windows with double-sided tape. After the plastic is sealed tight with a hair dryer, you have a DIY double pane window that keeps the RV warmer. If installed correctly, you shouldn’t even notice the plastic covering the window. This can help save on heating costs but also can help fight back against RV condensation as your RV will be warmer.
Use Moisture Absorbers
If you’re not camping in cold temperatures, moisture absorbers can be a tremendous help in reducing RV condensation. When placed in your RV, moisture absorbers will soak up a great deal of water vapour reducing RV condensation. You can buy DampRid which is a cheap option but also contains chemicals which could accidently be ingested by children or pets if not properly stored.
Eva-Dry makes what they call renewable “mini-dehumidifiers” which are very similar to DampRid, however, they don’t contain the harmful chemicals. Also once, you’ve bought a unit, you don’t have to purchase further crystals like you do with DampRid. Instead, you plug in the unit which recharges it.
Both Damp Rid & Eva-Dry are great options if you’re in a warmer climate with minimal condensation to begin with. They’re good in spaces with less air flow like closets and cabinets.


Keep Your RV Warm
By increasing the temperature of your RV, you will be able to reduce RV condensation which often increases at lower temperatures. Not only will you be warmer but you won’t have to worry about dealing with RV condensation which is a bonus.
Use a Dehumidifier
There really is no better option at reducing RV condensation than a full-sized dehumidifier. If you’re full-time RVing in cold, humid, and/or wet conditions a dehumidifier is a must. When in use a dehumidifier will basically capture all of the airborne water vapour into a bucket that you then dump once it’s full. There are models that have drain hoses which you can hook up and run out a slide room or window so you never have to worry about emptying your dehumidifier.
Using a dehumidifier will drastically reduce RV condensation. It’s likely a dehumidifier will make RV condensation a non-issue.
How to Pick the Right Dehumidifier
I’m not going to lie. I spent hours studying dehumidifiers before purchasing the unit we now have. Because they can be costly, I wanted to make sure we got our hands on a dehumidifier that would solve our RV condensation issues for good.
Here are some things to keep in mind when purchasing a dehumidifier for your RV:
- Size. Dehumidifiers can be a bit bulky but still should be able to be placed within your RV easily. Try to get one with wheels so you can move it around easier when needed.
- Noise. Some dehumidifiers can be noisy. Read the reviews/comments on the dehumidifier you’re looking at to see if other users made complaints about noise. Nowadays, most are pretty quiet and offer a slight amount of white noise which actually helps to block exterior noise at night when sleeping.
- Energy Efficient. There are some dehumidifiers that suck a lot of power. When in an RV you only have so much power (30 or 50 amps) to spare. Luckily, there are a lot of dehumidifiers now available that are energy efficient. I believe our unit only uses 4-5 amps of power which isn’t much at all.
- Built-in Hygrometer. A lot of dehumidifiers now come with built-in hygrometers which will tell you what the relative humidity of your RV is. If your dehumidifier doesn’t have a built-in hygrometer you can purchase a small standalone unit for $10-15. We’ll go into relative humidity later.
- Pints. You’ll see the word pints a lot when shopping for the right dehumidifier. So much so that you’ll likely want to head down to the pub for a pint yourself after reading about dehumidifiers for so long. Often dehumidifiers will come in 25, 50, & 75-pint variations or something similar. This means that your dehumidifier will be able to capture 25, 50, or 75 pints of water each day. Your dehumidifier is only capable of holding 10-15 pints in the bucket which means if you have a 50-pint dehumidifier you will likely have to empty it multiple times a day. That’s a lot of water. Here’s a good guide on how to pick the best-sized dehumidifier. Hint – most RVs would be well suited with a 25-30 pint dehumidifier.
What You Need to Know About Relative Humidity
Relative humidity (RH) which is measured with a hygrometer can tell you how much humidity is in your RV. The higher the number the more prone to RV condensation you will be. Determining what relative humidity to set your dehumidifier to can be tricky.
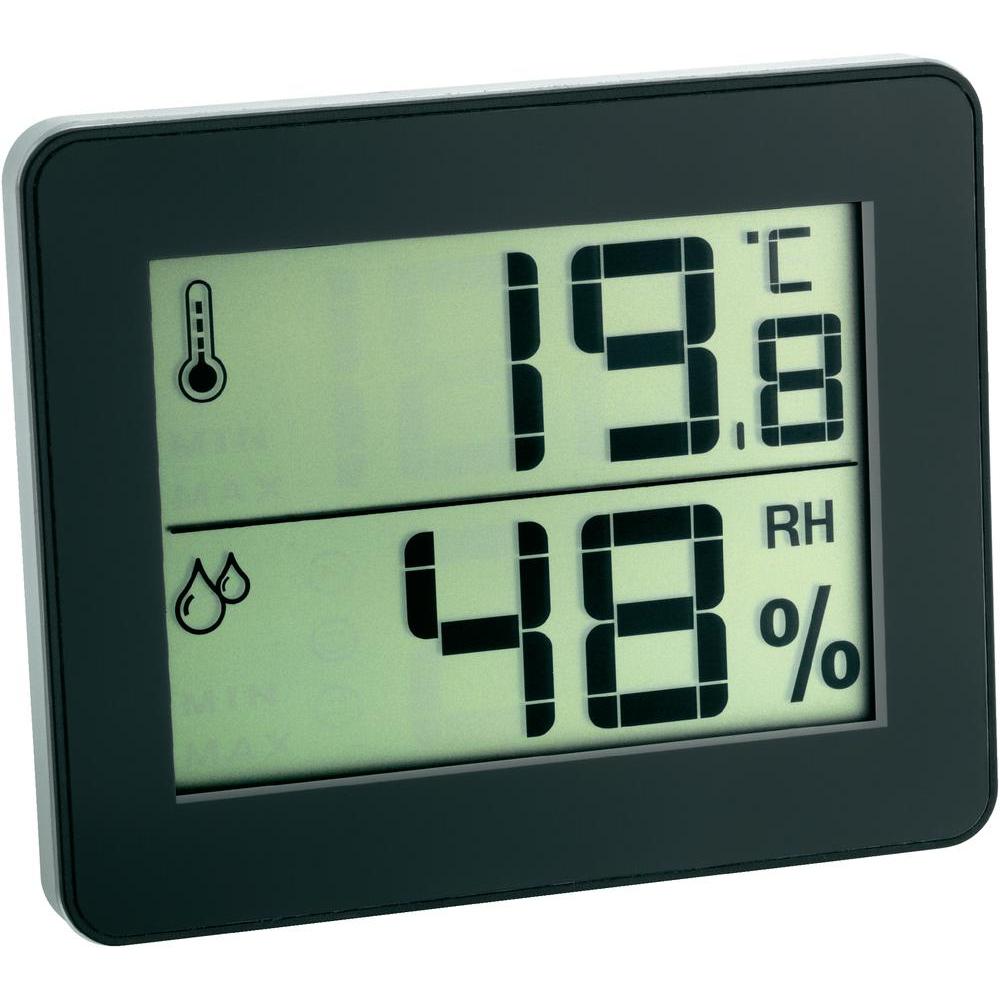
A digital hygrometer will often display the indoor temperature along with the relative humidity.
You know that you don’t want your RV to have a high relative humidity because of RV condensation. However, you also don’t want your RV too dry. If your RV is too dry it may lead to some health issues like nose bleeds & dry skin/eyes. It can also lead to the lining of your nasal passage to become dry and cracked leaving you more susceptible to colds & the flu.
The following chart should help you identify what relative humidity to set your dehumidifier to.
Outdoor Temperature | Indoor Relative Humidity Recommendation |
| +5C/40F | 45% |
| -1C/+30F | 40% |
| -4C/+20F | 35% |
| -12C/+10F | 30% |
Our Experience with RV Condensation
When we first moved into our RV full-time many fellow full-time RVers told us to get a dehumidifier. After looking at the costs of the larger dehumidifiers, we decided to purchase a small one made by Eva-Dry that other full-time RVers recommended. This did the trick for the most part but any time the temperature cooled off or it rained, the windows became very wet.
When we moved to Tofino, we were in for a brand new battle. Tofino is located in a temperate rain forest on the west coast of Vancouver Island. On average, Tofino gets almost 130 inches of rain a year, making it one of the wettest spots in Canada. The average humidity is above 75% and often in the 90s. These environmental conditions made it tough to battle RV condensation when we first arrived.
We did everything we could to battle RV condensation aside from purchasing a full-sized dehumidifier. Our hopes were that we could solve our RV condensation problems without a dehumidifier which would save us a few hundred bucks. We wrapped the windows which helped keep condensation away from the windows but we still had sweaty walls in hidden spots.
Finally, we determined it was time to get a full-sized 50-pint dehumidifier. We could’ve likely have gotten away with a 30-pint dehumidifier but I wanted to be sure this one would work. We weren’t sure what to expect but after having it hooked up for a short period our relative humidity in the RV went down from the 60’s to the 30’s no problem and effectively eliminated our issue with RV condensation. The only drawback has been that Kate finds it too dry at times. It doesn’t bother me, but overnight we often turn it off. When we wake up and turn it back on the relative humidity is still low and no condensation has formed on the windows.
Conquering our RV condensation problem took a lot of time. Looking back, I wish we splurged for the full-sized dehumidifier right away. I’m also glad we tried out each of the other ideas listed here because we now know what works and what doesn’t work in various situations and every situation in different. Sometimes the easiest solutions will help with RV condensation but when in doubt, a dehumidifier will for sure solve your condensation issues.
Have you dealt with RV condensation before? What tips/tricks do you have for dealing with it?
Like this post? Pin it!
12 comments
Awesome article – I have to have a de hunidifier for my COPD as indoors needs to be 30-40%. Made ton of difference in our 2014 Bounder MH.
Great article. We learnt the hard way too but we had to figure it out without the benefit of having a consistent shore power hookup that would be necessary to run a large dehumidifier. If you are running on battery as we are for much of the time while you boondocks, there are some things you can do.
Eva-dry make some great dehumidifier that run on 12v power, we have a 2200 and an 1100 in our rig but you have to buy the 12v cords as extras. Also, remove anything that is stored below windows as the cold air will collect and cause the walls to sweat and mold to form. Add smaller Eva-dry units into each cupboard. Keep your blinds up overnight so the damp air doesn’t get trapped behind them overnight. It can be a PITA but better to manage it proactively than reactively.
It it all gets too much, head down to Arizona where even the highest humidity is in the low 30’s… 😉
Thanks for reading and commenting, Mark. We were thinking of Arizona often when we were dealing with our condensation problems. We’re so glad they’re dealt with now!
A good article. The only thing I would add is to consider an air to air heat exchanger to bring fresh air into the RV while exhausting humid air to the outdoors. Cool air cannot hold as much water vapour as warm air, so the exchanger will warm the air and lower the indoor RH. The reason condensation collects on the walls or windows is because they are at a temperature cool enough to condense water vapour. In other words, the air inside the trailer that is at an RH of say 80% eventually makes its way over to a window where it cools down. As it cools the RH rises to 100% and then the air can no longer hold all the water vapour and some condenses out as water droplets.
Wonderful tip! Thanks for sharing 🙂
[…] Dehumidifer (from Full Time Canada) […]
Excellent article!
Have had my issues of humidity in my trailer last winter camping /worker Chetwynd BC … not too mention how cold it got .. -27 wasn’t fun to say the least… (as well as the frost on the walls ) anyways , I’m actually North East of you on the Island . now . Bowser area… and am going to have my first winter dealing with this high moisture content, so have been googling for some assistance.. your article was very good , thanks for sharing..
RVs with tin exteriors usually don’t have a moisture barrier, which is a major part of the problem. Dehumidifier is the way to go. A RV furnace has a heat exchanger, there is no open propane flame to the interior, and thus all the moisture from the burn is exhausted out of the RV.
Thank you for providing some numbers for relative humidity and the inexpensive fix. Also for the info on dehumidifiers. We are in NW Washington State and understand rain.
We installed a cubic mini woodstove built for yahts or rvs. Burning wood pellets or wood ended our condensation problen
ms as the heat it produces is very dry . Its like a miracle.
I live in a 24’x8’ travel trailer and have serious condensation on my metal window frames. I’ve done everything I can, insulation film on the windows, recaulked all the windows, Rfoiled the walls for insulation (got more condensation where that sweated), insulated flooring, cracked vents and a small window, got a propane heater, put 3 Eva-Dry dehumidifiers in 3 areas, cook & shower minimally with the hood fan running and still the condensation on my windows is uncontrollable. With the heater inside, I have no space to put a bigger dehumidifier and I am at my wits end! What more can I do?? Will putting insulation tape on the OUTSIDE of my window frames work to cut down the cold of the metal inside? Please HELP!
Hi Terri,
I am having the same problem with the metal window frames in the sleeping areas above the cab of my chev van 30. The rest of the windows are not having the same problem. I am not sure how to combat this yet… but I feel your pain!